Finches may be tiny birds, but they can create an impressive amount of mess. Seed hulls collect beneath feeders, feathers drift around the cage, water dishes become contaminated, and droppings build up on perches and cage liners.
Keeping up with that mess isn’t just about making the cage look nice.
A clean habitat helps keep food and drinking water sanitary, prevents waste from accumulating, and gives you an opportunity to notice changes in your finches’ droppings, eating habits, and general condition.
Fortunately, you don’t need to completely dismantle the cage every morning. The easiest approach is a combination of quick daily maintenance and a more thorough cleaning on a regular schedule.
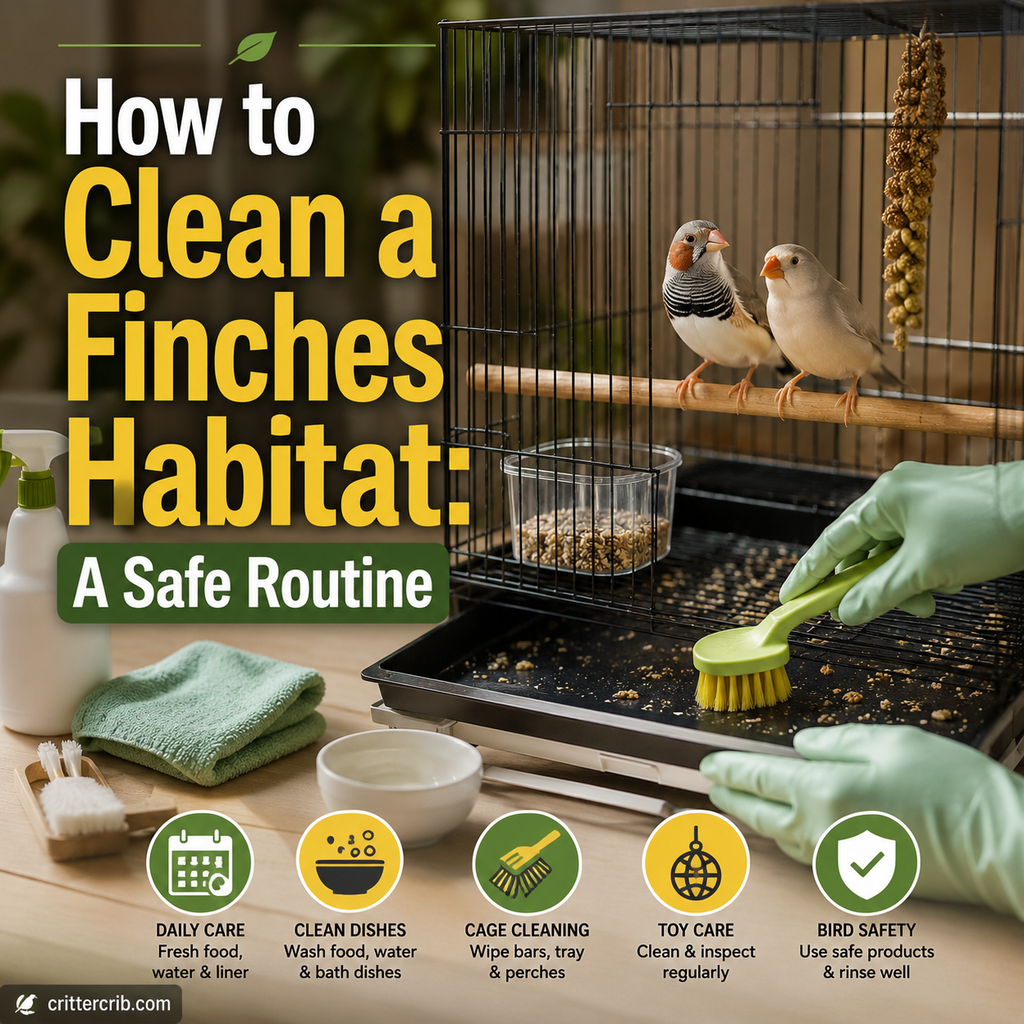
Here’s how to clean a finch habitat safely without making the routine unnecessarily complicated or stressful for your birds.
How Often Should You Clean a Finch Cage?
Some parts of a finch habitat need attention every day, while others can be cleaned less frequently.
A practical schedule looks something like this:
Every Day
- Replace drinking water
- Wash contaminated food and water dishes
- Remove leftover fresh foods
- Replace heavily soiled cage liner
- Spot-clean obvious droppings
- Check perches for heavy contamination
- Remove wet or spoiled material
Every Few Days
Depending on how quickly the cage becomes dirty, you may also need to:
- Replace the entire cage liner
- Wash frequently used perches
- Clean around feeders
- Wipe heavily soiled cage bars
- Clean bathing dishes thoroughly
Weekly or As Needed
Perform a more thorough cage cleaning that includes:
- Cage tray
- Grate, if used
- Perches
- Toys
- Cage bars
- Corners and seams
- Food and water containers
- Bathing accessories
There isn’t one perfect cleaning schedule for every finch habitat.
A large flight cage with two birds may stay cleaner than a smaller enclosure housing several finches. Diet, bathing habits, cage design, and the number of birds all affect how quickly waste accumulates.
The goal is to clean before the cage becomes visibly dirty, damp, or smelly.
Why Finch Cage Hygiene Matters
Bird cages naturally collect organic material.
That includes:
- Droppings
- Feathers
- Feather dust
- Seed hulls
- Discarded food
- Bath water
- Moisture
When food and waste are allowed to remain wet or accumulate for long periods, the environment becomes harder to keep sanitary.
Regular cleaning also makes monitoring your birds easier.
Fresh cage liner lets you notice changes such as unusual droppings or unexpected amounts of discarded food. Clean dishes make it easier to tell whether the birds are actually eating.
Think of cleaning as part of your daily health check rather than simply a household chore.
What Supplies Do You Need to Clean a Finch Cage?
You don’t need an elaborate collection of cleaning products.
Keeping a dedicated set of bird-cleaning supplies can make the routine easier.
Useful items include:
- Paper towels
- Plain cage-liner paper
- Small scrub brush
- Bottle brush for water containers
- Clean sponges or cloths
- Bird-safe cleaning product when needed
- Mild unscented dish soap for appropriate removable items
- Clean water
- Trash bag or waste container
- Spare food and water dishes
Keep bird-cleaning brushes and sponges separate from those used for kitchen counters, bathrooms, or other household cleaning.
That reduces the chance of cross-contamination.
What Should You Use on the Bottom of a Finch Cage?
Simple paper is one of the easiest cage liners to maintain.
Good options include:
- Plain paper
- Paper towels
- Appropriate commercially produced paper cage liners
Paper makes droppings easy to see and can be replaced quickly.
Avoid materials that make it difficult to monitor waste or that remain damp for long periods.
A simple liner isn’t particularly decorative, but it does its job well.
Why Monitoring Droppings Matters
Bird droppings can provide useful information about what’s happening with your finches.
Changes can occur because of diet, stress, increased water consumption, or health problems.
You don’t need to inspect every dropping with a magnifying glass. The point is to become familiar with what normally appears on the cage liner.
If something suddenly looks very different and stays that way, you’ll notice.
How to Clean Finch Food Dishes
Food containers can collect seed dust, hulls, saliva, droppings, and pieces of fresh food.
Check them every day.
If a dish is visibly contaminated, wash it before refilling it.
A practical routine is:
- Remove the food container.
- Discard old or contaminated food.
- Wash the dish with hot water and an appropriate mild cleaning method.
- Rinse thoroughly.
- Allow it to dry or dry it with a clean towel.
- Refill with fresh food.
Having two sets of dishes is convenient because you can replace a dirty bowl immediately while the other is being washed.
Don’t Just Refill Seed Bowls
Seed hulls can make a bowl look full even when much of the edible food is gone.
Don’t continually pour new seed on top of old material without checking what’s actually in the dish.
Empty and inspect feeders regularly.
How to Clean Finch Water Dishes
Drinking water deserves particular attention.
Finches may contaminate water with:
- Food
- Seed hulls
- Droppings
- Bathing debris
- Feathers
Replace drinking water at least daily and sooner if it becomes dirty.
Don’t simply top off yesterday’s water.
Wash the container, rinse it thoroughly, and provide fresh water.
Position Water Carefully
Avoid placing a perch directly above the water container.
Otherwise, you may find yourself replacing contaminated water repeatedly throughout the day.
Good cage arrangement can reduce cleaning work significantly.
Cleaning Finch Baths
Many finches enthusiastically bathe.
Unfortunately, a clean bird bath can become messy very quickly.
Bathing water may contain:
- Feathers
- Droppings
- Food particles
- Dust
- Other cage debris
If you provide a bath, replace dirty water promptly and wash the container regularly.
Don’t leave stagnant bathing water sitting in the cage all day.
Some owners offer the bath for a limited period and remove it after the birds have finished.
How to Spot-Clean a Finch Cage
Spot-cleaning is what prevents the weekly cleaning session from becoming a major project.
Once or twice a day, take a quick look around the cage.
Check:
- Cage liner
- Favorite perches
- Food dishes
- Water
- Cage bars near resting areas
- Bath
- Toys
Remove obvious contamination as needed.
A few minutes of daily maintenance can prevent droppings and food from drying into stubborn layers.
How to Deep-Clean a Finch Cage
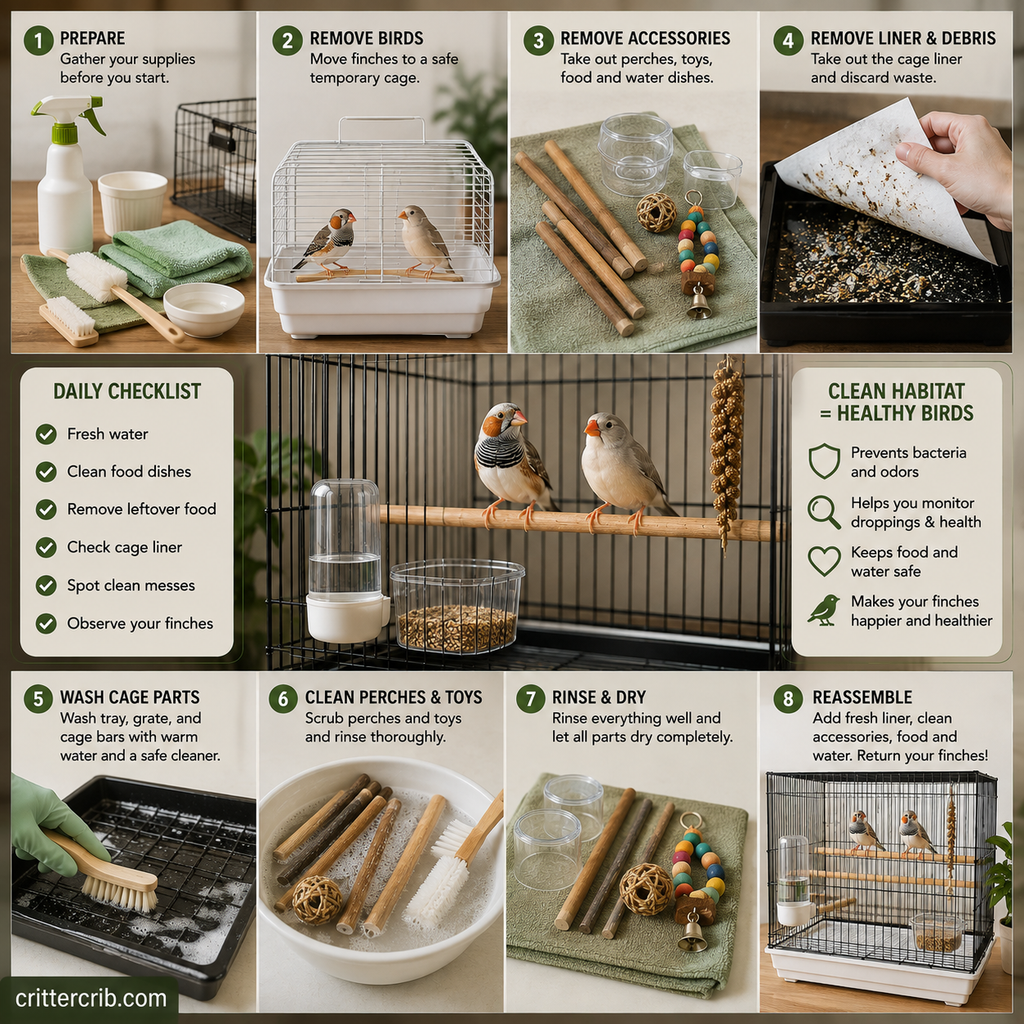
A thorough cage cleaning doesn’t need to happen every day, but it should be part of your regular routine.
The exact frequency depends on the enclosure and number of birds.
Here’s a straightforward process.
1. Prepare Everything First
Gather your cleaning supplies before disturbing the cage.
Have clean:
- Liner
- Dishes
- Perches if replacing any
- Towels
- Brushes
- Water
Preparing first reduces the amount of time the birds are disrupted.
2. Move the Finches if Necessary
For major cleaning, you may need to move your finches to a secure temporary cage or carrier.
Make sure the temporary enclosure:
- Is escape-proof
- Has safe bar spacing
- Contains appropriate perches
- Is kept in a comfortable location
- Is protected from other pets
Never release finches into an unsecured room simply because you’re cleaning their cage.
They’re fast flyers and can easily escape through an open door or window.
3. Remove Accessories
Take out removable items such as:
- Food bowls
- Water dishes
- Bath
- Toys
- Swings
- Removable perches
This gives you access to corners and cage bars that are normally difficult to reach.
4. Remove the Old Cage Liner
Roll or fold the liner inward so debris doesn’t spill everywhere.
Discard it.
If the cage uses a removable bottom tray, take that out for washing.
5. Remove Loose Debris
Before getting everything wet, remove loose:
- Seeds
- Hulls
- Feathers
- Dried food
- Other debris
This makes washing easier.
6. Wash the Cage
Clean cage bars, corners, the tray, and other dirty surfaces.
Pay particular attention to areas beneath favorite sleeping perches because droppings often accumulate there.
Use bird-safe cleaning practices and avoid exposing your finches to fumes.
7. Scrub Stubborn Areas
Dried bird droppings can be surprisingly difficult to remove.
Moistening the area first can help soften dried material.
Use a dedicated brush rather than scraping aggressively with something that could damage the cage coating.
8. Rinse Thoroughly
If you’ve used a cleaning product, rinse surfaces thoroughly.
Residue shouldn’t remain where birds may walk, perch, eat, or chew.
9. Let Everything Dry
Allow the cage and accessories to dry before reassembling the habitat.
A clean, dry environment is preferable to returning birds to wet surfaces.
10. Reassemble the Habitat
Add:
- Fresh liner
- Clean perches
- Clean toys
- Fresh food
- Fresh drinking water
Check that everything is securely attached before returning the birds.
How to Clean Finch Perches
Perches collect droppings and food residue because finches spend so much time on them.
Natural wood perches may require scrubbing when dirty.
For removable washable perches:
- Remove the perch.
- Soften dried debris with water if necessary.
- Scrub the surface.
- Rinse thoroughly.
- Allow it to dry completely.
- Inspect it before returning it to the cage.
Inspect Perches While Cleaning
Cleaning is a good opportunity to look for:
- Splintering
- Cracks
- Sharp edges
- Loose attachments
- Excessive wear
Replace damaged perches rather than continuing to scrub and reuse them.
How to Clean Finch Toys and Accessories
Different materials require different cleaning methods.
Hard, washable bird-safe toys can generally be cleaned more thoroughly than materials designed for shredding.
Inspect every item.
Discard toys that have become:
- Heavily soiled
- Moldy
- Frayed
- Broken
- Sharp
- Difficult to sanitize
- Unsafe because of exposed components
Porous items can be harder to clean completely once they’re heavily contaminated.
Sometimes replacement is more practical than trying to save an inexpensive, badly soiled toy.
What Cleaning Products Are Safe Around Finches?
Birds have sensitive respiratory systems, so cleaning products need to be chosen carefully.
Avoid exposing your finches to strong fumes.
Be cautious with products such as:
- Aerosol cleaners
- Strongly scented cleaners
- Air fresheners
- Disinfectant sprays used near the birds
- Products containing harsh fumes
- Fragranced household products
Never spray cleaning products into an occupied bird cage.
For routine cleaning, hot water, physical scrubbing, and mild bird-appropriate cleaning methods can handle much of the work.
When disinfection is necessary, use a product appropriate for bird environments and follow its instructions carefully, including dilution, contact time, rinsing, and ventilation requirements.
Can You Use Vinegar to Clean a Finch Cage?
Diluted white vinegar is commonly used by bird owners for routine cleaning because it can help loosen mineral deposits and grime.
However, vinegar isn’t automatically an appropriate disinfectant for every situation.
There’s an important difference between:
- Cleaning visible dirt
and
- Disinfecting against specific pathogens
For everyday cage maintenance, physical cleaning and thorough rinsing may be sufficient for many surfaces.
If you’re dealing with an illness, contagious disease, or a veterinarian has instructed you to disinfect the environment, follow the veterinarian’s recommended product and procedure.
Can You Use Bleach on a Bird Cage?
Bleach can produce irritating fumes and requires careful dilution, ventilation, contact time, and rinsing.
It shouldn’t casually be sprayed around birds.
If disinfection with bleach or another stronger disinfectant is medically necessary, remove the birds from the area and follow professional guidance for proper dilution and use.
The cage should be thoroughly rinsed and completely free of fumes before the birds return.
For routine everyday cleaning, strong disinfectants generally aren’t something you need to reach for automatically.
Keep Cleaning Fumes Away From Finches
This point deserves emphasis.
Don’t clean the cage while filling the surrounding air with:
- Aerosol sprays
- Perfumes
- Air fresheners
- Scented disinfectants
- Strong chemical fumes
If you’re cleaning other parts of the room, consider where those fumes are traveling.
A product doesn’t have to be sprayed directly into the cage to expose the birds.
Good ventilation matters, but never create a strong cold draft directly across the cage.
Should You Completely Rearrange the Cage While Cleaning?
You can make small changes, but a deep cleaning doesn’t necessarily need to become a complete habitat redesign.
Finches benefit from a familiar environment.
If you’re introducing:
- New perches
- New toys
- Different feeders
- Major layout changes
consider doing so thoughtfully rather than changing everything at once.
Maintaining some familiar perch locations can make the freshly cleaned habitat feel less disruptive.
Cleaning Around the Finch Cage
Anyone who has kept finches knows the mess doesn’t stop at the cage bars.
Seed hulls seem capable of traveling impressive distances.
Regularly clean:
- Floor beneath the cage
- Cage stand
- Nearby walls
- Furniture
- Window ledges
- Baseboards
A washable floor mat beneath the cage can make cleanup easier.
If you vacuum around your birds, avoid frightening them and make sure the equipment isn’t blowing dust directly into the cage.
How to Reduce Finch Cage Mess
You can’t eliminate bird mess completely, but good cage design helps.
Position Perches Carefully
Don’t place perches directly over food, water, or baths.
Avoid Overcrowding
A cluttered cage creates more surfaces for waste to collect and makes cleaning difficult.
Use Easy-to-Replace Liners
Simple paper liners make daily cleanup faster.
Choose Accessible Feeders
Food dishes should be easy to remove without dismantling half the cage.
Keep Spare Dishes
Having clean replacements ready makes daily food and water changes much more convenient.
Clean Small Messes Early
Fresh droppings and food residue are usually much easier to remove than material that has dried for several days.
Common Finch Cage Cleaning Mistakes
A few habits can make cleaning less effective or potentially unsafe.
Waiting Until the Cage Smells
A bird cage shouldn’t need to smell bad before it’s cleaned.
Visible contamination is enough reason to clean.
Topping Off Dirty Water
Always replace old drinking water rather than continually adding fresh water to what’s already there.
Spraying Cleaner Around the Birds
Remove the birds when necessary and keep cleaning fumes away from them.
Forgetting Food Containers
A clean cage with dirty bowls isn’t a clean habitat.
Food and water hygiene should be part of the daily routine.
Ignoring Wooden Perches
Natural perches need inspection and cleaning too.
Replace them if they become impossible to clean or develop damage.
Using Too Much Cleaner
More product doesn’t necessarily mean a cleaner cage.
Physical removal of dirt, proper washing, rinsing, and drying are important.
Returning Birds to a Wet Cage
Let cleaned surfaces dry before putting everything back together.
Cleaning Without Inspecting
Cleaning gives you a perfect opportunity to notice damaged cage bars, loose toys, worn perches, and other potential hazards.
Don’t waste that opportunity.
A Simple Finch Cleaning Schedule
If you’re looking for an easy routine to follow, use this as a starting point.
Morning
- Replace drinking water
- Check food
- Remove spoiled fresh food
- Inspect cage liner
- Check the bath
- Observe the birds
Evening
- Remove leftover perishable foods
- Check water again
- Spot-clean obvious messes
- Inspect frequently used perches
Weekly
- Replace all cage liner
- Wash the tray
- Clean cage bars
- Scrub dirty perches
- Wash appropriate toys
- Clean all dishes
- Inspect cage hardware
- Clean the surrounding floor and furniture
Adjust the schedule based on how quickly your particular habitat becomes dirty.
Cleaning Is Also a Health Check
One of the biggest benefits of regular cage maintenance is familiarity.
When you clean every day, you naturally learn what’s normal.
You know approximately:
- How much your finches eat
- How much food they scatter
- What their droppings usually look like
- Which perches they use
- How active they normally are
That makes changes easier to spot.
Contact an avian veterinarian if you notice concerning changes such as:
- Persistent abnormal droppings
- Significant appetite changes
- Unexplained weight loss
- Difficulty breathing
- Persistent feather puffing
- Unusual weakness
- Sitting on the cage floor
- Major changes in normal activity
Cleaning isn’t a substitute for veterinary care, but it can help you notice when something has changed.
Frequently Asked Questions About Cleaning a Finch Cage
How often should I change finch cage paper?
Replace cage paper whenever it becomes significantly soiled or wet.
Many owners check it daily and replace it frequently because fresh paper makes both cleaning and health monitoring easier.
Should I clean finch food bowls every day?
Check food bowls daily and wash them whenever they’re dirty or contaminated.
Containers used for moist or fresh foods should be cleaned particularly carefully.
How often should finch water be changed?
Provide fresh drinking water at least once a day and replace it immediately if it becomes contaminated.
Wash the water container rather than simply topping it off.
How often should I deep-clean a finch cage?
A thorough cleaning about weekly is a useful starting point, although the appropriate frequency depends on cage size, number of birds, diet, and how quickly the enclosure becomes dirty.
Daily spot-cleaning will make deep cleaning much easier.
Can I clean the cage while my finches are inside?
Minor tasks such as replacing food and water can usually be performed with the birds inside if they aren’t excessively stressed.
For major scrubbing, disassembly, or any cleaning involving products that could create fumes, moving the birds to a secure temporary enclosure is safer.
Can I use scented cleaning products around finches?
It’s best to avoid exposing birds to scented cleaners, aerosol sprays, air fresheners, and other strong fumes.
Birds have sensitive respiratory systems.
What is the easiest finch cage liner to clean?
Plain paper or paper towels are convenient because they’re inexpensive, easy to replace, and allow you to see droppings clearly.
Final Thoughts on Cleaning a Finch Habitat
Keeping a finch habitat clean doesn’t require hours of work every day.
Consistency is what makes the difference.
Replace drinking water daily, remove spoiled food, keep dishes clean, change dirty cage liner, and spot-clean messes before they become difficult to remove. Then give the habitat a more thorough cleaning on a regular schedule.
While you’re cleaning, pay attention.
Look at the condition of the perches. Check toys for damage. Notice how much food has been eaten. Look at the cage liner. Observe how your finches are behaving.
Those few extra seconds turn an ordinary cleaning routine into a useful daily health check.
The best finch habitat isn’t one that looks spotless every second of the day. Birds are naturally messy.
It’s one that’s consistently kept clean, dry, safe, and comfortable for the little birds living in it.