Chinchillas are naturally tidy animals, but that doesn’t mean their habitat stays clean on its own. Between hay, droppings, fur, food crumbs, dust, and the occasional wet spot, even a well-maintained enclosure needs regular attention.
The good news is that chinchilla habitat cleaning doesn’t have to mean tearing everything apart every few days.
A better approach combines quick daily maintenance with more thorough cleaning when needed. This keeps the enclosure sanitary while avoiding unnecessary disruption to your chinchilla’s environment.
There are also a few important differences between cleaning a chinchilla habitat and cleaning one for many other small pets. Chinchillas need dry conditions, shouldn’t be exposed to harsh cleaning chemicals, and should never be placed back into an enclosure while surfaces are still wet.
This guide walks through a practical chinchilla cleaning routine, including daily spot cleaning, deeper cleaning, bedding, shelves, food and water containers, dust baths, and common mistakes to avoid.
Why a Clean Chinchilla Habitat Matters
Cleaning isn’t just about making the enclosure look nice.
Your chinchilla spends a large portion of its life there. Keeping that environment dry and sanitary helps reduce exposure to accumulated urine, spoiled food, excessive dust, and other debris.
Regular cleaning also gives you an opportunity to notice things you might otherwise miss.
While cleaning, you may spot:
- Changes in droppings
- Unusual urine spots
- Uneaten food
- A leaking water bottle
- Damaged cage accessories
- Sharp edges
- Chewed plastic
- Damp bedding
- Excessive fur
- Changes in eating or bathroom habits
In other words, cleaning doubles as a basic health and safety inspection.
How Often Should You Clean a Chinchilla Cage?
There’s no single schedule that works perfectly for every chinchilla.
Cleaning frequency depends on the enclosure size, number of chinchillas, bedding or liner system, litter habits, ventilation, and how quickly particular areas become dirty.
A useful routine generally involves three levels of cleaning:
Daily
Perform quick maintenance such as:
- Removing obviously wet or dirty material
- Picking up discarded food
- Removing soiled hay
- Checking food and water
- Inspecting shelves for urine
- Looking for damaged accessories
- Checking the enclosure’s general condition
This usually takes only a few minutes.
Every Few Days
Depending on your setup, you may need to:
- Refresh particularly dirty bedding areas
- Change or clean heavily used liners
- Wipe frequently soiled shelves
- Clean the hay area
- Wash food dishes
- Address accumulating debris
Regular Deep Cleaning
Periodically, give the enclosure a more thorough cleaning.
This may involve removing accessories, replacing bedding or washing liners, wiping down surfaces, cleaning shelves and hides, washing food and water equipment, and inspecting everything before putting the habitat back together.
The exact timing should be based on actual cleanliness rather than blindly following the calendar.
If something is dirty today, don’t leave it until “cleaning day.”
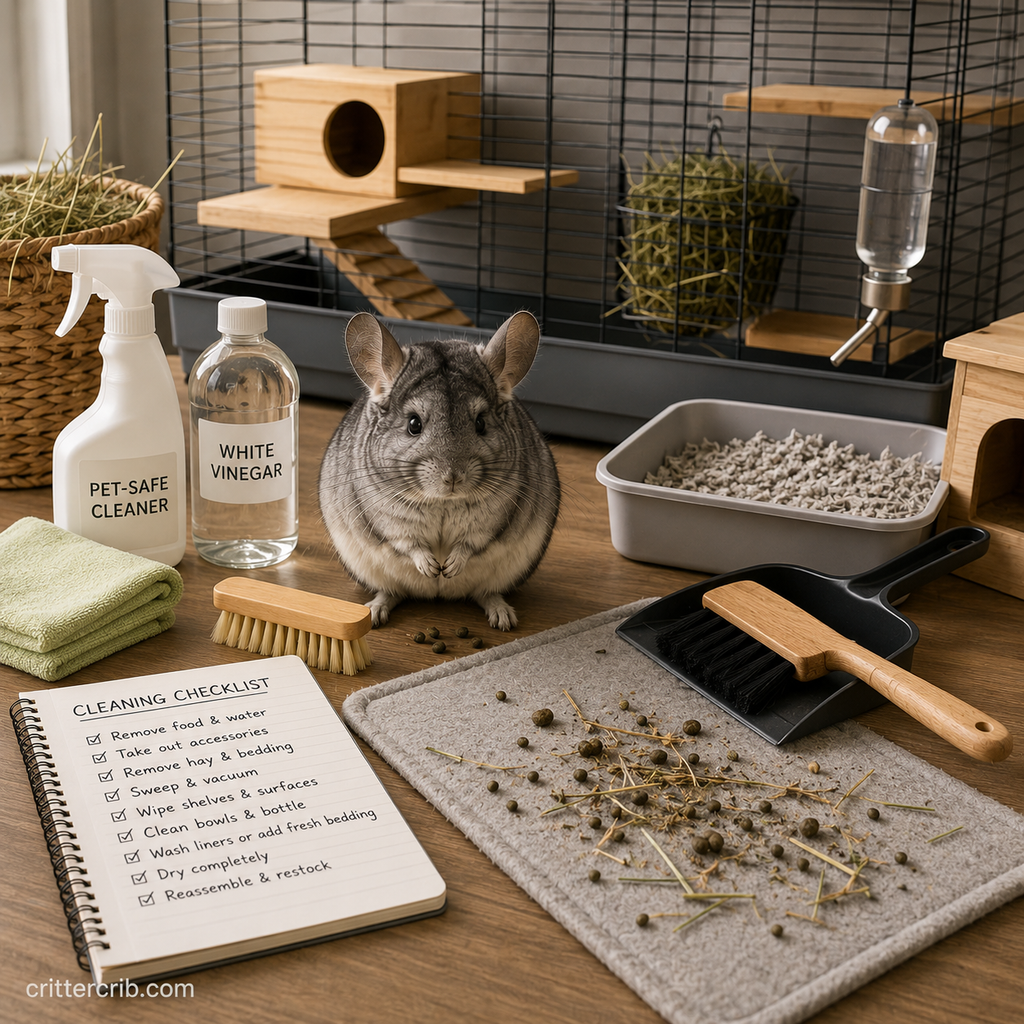
Supplies for Cleaning a Chinchilla Habitat
Gathering everything before you begin makes the process easier.
Useful supplies may include:
- Small broom and dustpan
- Handheld vacuum
- Paper towels or clean reusable cloths
- Fresh bedding
- Replacement fleece liners, if used
- Mild pet-safe cleaner
- White vinegar diluted appropriately for cleaning
- Warm water
- Scrub brush
- Bottle brush
- Trash bag
- Clean drying towels
Keep cleaning supplies used for the chinchilla separate from products used around toilets, kitchens, or harsh household chemicals.
Be Careful With Cleaning Products
You don’t need a powerful fragrance to know something is clean.
In fact, strongly scented products are generally a poor choice around chinchillas.
Avoid exposing your chinchilla to:
- Bleach fumes
- Ammonia fumes
- Strong perfumes
- Essential oils
- Aerosol cleaners
- Heavily fragranced disinfectants
- Residue from harsh household chemicals
If you’re using a commercial product, choose one that’s appropriate for animal enclosures and follow its instructions carefully.
Regardless of the cleaner, surfaces should be properly rinsed when required and completely dry before your chinchilla returns.
Where Should Your Chinchilla Go While You Clean?
For quick spot cleaning, your chinchilla may be able to remain in the enclosure if you can work safely without frightening or exposing it to cleaning products.
For larger cleaning sessions, moving the chinchilla to a secure temporary location is usually easier.
Possible temporary areas include:
- A secure carrier
- A safe exercise enclosure
- Another suitable chinchilla-safe habitat
Never allow your chinchilla to roam freely around the room while you’re distracted with cleaning.
Chinchillas are quick, curious, and enthusiastic chewers.
A few seconds of inattention can be enough for one to find an electrical cord, disappear behind furniture, or investigate something unsafe.
Step-by-Step Chinchilla Habitat Cleaning Routine
Once your chinchilla is secure, you can work systematically through the enclosure.
Step 1: Remove Food, Water, and Loose Accessories
Start by removing items that need separate cleaning.
These may include:
- Food bowls
- Water bottles
- Hay containers
- Toys
- Hides
- Litter pans
- Loose platforms
- Chew items
Inspect everything as you remove it.
Look for damage, sharp edges, heavy staining, dampness, or areas that are becoming difficult to clean.
Don’t automatically put every item back simply because it was there before.
Cleaning day is a good time to retire anything that’s no longer safe.
Step 2: Remove Old Hay and Food Debris
Chinchillas can make impressive hay messes.
Remove hay that has fallen into dirty areas, become damp, or mixed with urine and other debris.
Also look for food that may have been scattered or hidden around the enclosure.
Dry hay that’s still clean is different from hay that’s wet or contaminated.
When in doubt about contaminated food, discard it.
Step 3: Remove Droppings
Chinchillas produce plenty of small, dry droppings.
That’s normal.
Sweep or vacuum loose droppings from shelves, platforms, corners, and the enclosure floor.
A small handheld broom is often convenient for daily cleaning.
If using a vacuum, remove your chinchilla from the immediate area first. The sound may be stressful, and you don’t want your pet investigating a running vacuum.
Step 4: Remove Bedding or Liners
What happens next depends on your enclosure setup.
Disposable Bedding
Remove heavily soiled bedding and replace it with fresh, chinchilla-safe material.
During a full cleaning, you may replace the entire bedding layer.
Fleece Liners
Shake or brush loose hay and droppings from the liner before washing.
Wash reusable liners according to the manufacturer’s instructions, preferably using a routine that doesn’t leave strong fragrances or fabric-softener residue.
Have a second clean set ready.
That way, you don’t need to wait for laundry to finish before rebuilding the habitat.
Step 5: Clean the Cage Floor
Once loose debris has been removed, wipe the enclosure floor.
Pay extra attention to:
- Corners
- Areas beneath hay racks
- Favorite bathroom spots
- Areas beneath shelves
- Spaces around food bowls
Dried urine may require a little more work than ordinary dust and debris.
Allow appropriate cleaning solutions time to loosen buildup rather than aggressively scraping a surface and potentially damaging it.
Step 6: Wipe Shelves and Platforms
Chinchillas love elevated shelves, and those shelves often become some of the dirtiest surfaces in the habitat.
Wooden ledges require special attention because wood can absorb moisture.
Inspect each platform for:
- Urine stains
- Dampness
- Chewed edges
- Splinters
- Loose hardware
- Heavy buildup
Light surface dirt can often be brushed or wiped away.
If a wooden accessory becomes deeply saturated with urine, develops an odor that won’t go away, becomes excessively damaged, or can’t be cleaned effectively, replacement may be the safest option.
Step 7: Clean Hides and Accessories
Clean reusable hides and accessories according to their material.
Hard, nonporous items are generally easier to wipe and sanitize than porous wood.
Wooden accessories shouldn’t be soaked unnecessarily because they can absorb substantial moisture and take a long time to dry.
After cleaning, inspect all items carefully.
Check for:
- Cracks
- Sharp points
- Exposed hardware
- Loose pieces
- Unsafe chew damage
Your chinchilla has probably been conducting its own remodeling project between cleaning days.
Make sure the results are still safe.
Step 8: Clean Food Bowls
Food bowls should be emptied and washed regularly.
Remove:
- Food dust
- Crumbs
- Hay
- Droppings
- Other debris
Rinse the bowl thoroughly and dry it before returning it to the enclosure.
Heavy ceramic dishes are often convenient because they’re relatively difficult for a chinchilla to flip over.
Step 9: Clean the Water Bottle
Don’t overlook the water bottle.
A bottle can look clean from across the room while developing buildup inside the container or drinking tube.
Regularly:
- Empty old water.
- Clean the bottle.
- Clean the drinking tube and nozzle.
- Rinse everything thoroughly.
- Refill with fresh water.
- Confirm that water actually flows through the nozzle.
Checking flow is important.
A full bottle isn’t useful if the drinking mechanism is blocked.
Also watch for leaks. A dripping bottle can create a persistent wet area inside the habitat.
Step 10: Let Everything Dry Completely
This step matters especially for chinchillas.
Don’t rush to put everything back while surfaces are still damp.
Chinchillas have extremely dense fur, and their living environment should remain dry. Persistent moisture can create unsanitary conditions and cause problems with bedding, wooden accessories, and the habitat itself.
After cleaning:
- Wipe away excess moisture.
- Allow surfaces to air-dry.
- Make sure wooden accessories are thoroughly dry.
- Check corners and seams.
- Don’t cover damp surfaces with fresh bedding.
Only rebuild the habitat once it’s ready.
Step 11: Add Fresh Bedding or Clean Liners
Once everything is dry, replace the floor covering.
Use fresh bedding or a clean liner appropriate for your enclosure.
Make sure the material lies securely and doesn’t expose areas where your chinchilla could become trapped or chew something unsafe.
If you use fleece, check that it isn’t developing loose threads.
Step 12: Return the Accessories
Put shelves, hides, bowls, hay areas, and enrichment back into the enclosure.
You don’t have to put everything in precisely the same location every time, but there’s also no need to completely redesign the habitat during every cleaning.
Familiarity can be comforting.
Before returning your chinchilla, make sure:
- Shelves are securely attached.
- Hides are stable.
- Nothing can fall.
- Jumping routes are safe.
- Food and water are accessible.
- No cleaning supplies remain nearby.
Step 13: Add Fresh Hay, Food, and Water
Finish by providing fresh essentials.
Add:
- Fresh hay
- Appropriate food
- Fresh drinking water
Confirm one more time that the water bottle works.
Then return your chinchilla to its clean habitat.
Expect an immediate inspection.
Your chinchilla may sniff everything, jump between shelves, investigate the clean bedding, or begin rearranging items as though your work requires correction.
Daily Spot Cleaning Makes Deep Cleaning Easier
The easiest deep-cleaning routine starts several days earlier.
A few minutes of maintenance each day prevents small messes from becoming large ones.
A Quick Daily Routine
Once a day:
- Remove wet areas.
- Pick up heavily soiled hay.
- Sweep obvious droppings from shelves.
- Remove leftover or contaminated food.
- Check the water bottle.
- Inspect frequently used surfaces.
- Look for damaged items.
You don’t need to make the habitat look brand new every morning.
You’re simply staying ahead of moisture, waste, and debris.
Cleaning Chinchilla Bedding
Your bedding routine depends on the material you’re using.
Whatever you choose should be appropriate for chinchillas, absorbent, low in problematic dust, and safe if your pet investigates it.
Avoid using strongly scented materials simply to cover odors.
A clean chinchilla habitat shouldn’t need perfume.
If the enclosure consistently smells strongly despite regular maintenance, look for the source.
Possible causes include:
- Wet bedding
- A leaking bottle
- Urine-soaked wood
- Dirty liners
- Contaminated hay
- A frequently used bathroom corner
Fixing the underlying problem is better than masking the smell.
Cleaning Fleece Liners
Reusable fleece can make everyday cleanup convenient, but it requires a good laundry routine.
Before washing:
- Shake off hay.
- Sweep away droppings.
- Remove loose fur.
- Check for damaged areas.
Wash according to the liner manufacturer’s directions.
Avoid products that leave heavy fragrances or coatings behind.
Fabric softeners may reduce absorbency and leave residues, so they’re generally not useful for absorbent pet liners.
Make sure liners are completely dry before putting them back.
Having multiple sets makes this much easier.
Cleaning Wooden Chinchilla Shelves
Wood is common in chinchilla habitats because it provides a solid surface and can be safer for chewing than many plastics.
The downside is that it’s porous.
Urine can soak into unfinished wood.
For Light Cleaning
Brush away debris and wipe the surface without saturating it.
Allow the shelf to dry completely.
For Heavier Stains
A more thorough cleaning may be needed.
Avoid soaking wood unnecessarily.
If urine has penetrated deeply enough that the shelf remains stained, damp, or smelly despite cleaning, replacement may be more practical.
Regular spot cleaning helps wooden shelves last longer.
What About Plastic Accessories?
Chinchillas are enthusiastic chewers, which makes plastic accessories potentially problematic.
If plastic is present in the habitat, inspect it regularly.
Replace anything showing significant chewing or damage.
Don’t assume an item is safe simply because it was marketed for small animals.
The material, shape, accessibility, and your individual chinchilla’s chewing habits all matter.
How to Clean a Chinchilla Dust Bath
Dust baths are an important part of chinchilla grooming, but the bath container needs attention too.
Chinchillas shouldn’t have unlimited access to the bath all day unless specifically advised for a particular reason.
After a bathing session, inspect the dust.
Remove obvious debris such as:
- Droppings
- Hay
- Bedding
- Food particles
Follow the dust manufacturer’s recommendations regarding reuse and replacement.
The bath container itself should also be cleaned periodically.
Make sure it’s completely dry before adding fresh dust.
Don’t Use Water to Bathe Your Chinchilla
Cleaning the habitat with water where appropriate is very different from bathing the chinchilla itself.
Chinchillas have exceptionally dense fur.
Getting the coat wet can make drying difficult and may contribute to skin and fur problems.
Routine grooming is accomplished through appropriate chinchilla bathing dust rather than conventional water baths.
If your chinchilla becomes contaminated with something that can’t safely be removed with normal grooming, contact a veterinarian for advice rather than placing the animal in a sink or bathtub.
Keeping Hay Areas Clean
Hay gets everywhere.
That’s simply part of living with a chinchilla.
However, hay that has become wet or contaminated should be removed.
Keep fresh hay accessible while preventing excessive accumulation beneath feeders.
During your daily check:
- Remove dirty hay.
- Check for moisture.
- Look for droppings mixed into feeding areas.
- Refill with fresh hay as needed.
A well-designed hay feeder can reduce waste, but make sure it doesn’t create a trapping hazard or make hay difficult to reach.
Dealing With Urine Spots
Some chinchillas repeatedly urinate in the same locations.
If yours has a favorite spot, use that predictability to your advantage.
Check the area every day.
Frequent attention prevents urine from soaking deeply into:
- Wooden shelves
- Bedding
- Liners
- Corners
- Other porous materials
You may also be able to arrange the habitat so the preferred bathroom area is easier to clean.
How to Reduce Chinchilla Cage Odor
A healthy, regularly maintained chinchilla habitat shouldn’t require air fresheners or fragrance products.
Odor usually indicates that something needs cleaning.
Focus on:
- Removing wet bedding
- Washing dirty liners
- Cleaning urine spots
- Removing contaminated hay
- Washing food containers
- Checking wooden accessories
- Checking for a leaking bottle
Ventilation also matters.
The enclosure should have good airflow without being placed directly in a cold draft.
Avoid spraying deodorizing products around the cage.
A clean habitat is the solution—not a stronger scent.
Should You Completely Rearrange the Cage After Cleaning?
You can make occasional changes for enrichment, but you don’t need to transform the enclosure every time you clean it.
Your chinchilla learns the layout.
It knows where shelves, food, water, hides, and preferred jumping routes are located.
Constantly changing everything may make the environment less predictable.
When you do rearrange the habitat, pay close attention to safety.
Make sure new shelf positions don’t create:
- Dangerous falls
- Awkward jumps
- Entrapment areas
- Unstable objects
- Blocked food or water access
Enrichment should make the habitat more interesting without making it hazardous.
Cleaning a Habitat With Multiple Chinchillas
Two chinchillas generally create more waste than one, so expect more frequent maintenance.
Pay particular attention to shared resources.
Check:
- Food bowls
- Water bottles
- Hay areas
- Favorite shelves
- Sleeping locations
- Bathroom spots
Make sure both chinchillas can easily access food and water after you rebuild the enclosure.
You may also need duplicate resources depending on the animals and setup.
Common Chinchilla Cage Cleaning Mistakes
A few cleaning habits can create more problems than they solve.
Using Strongly Scented Cleaners
A strong artificial fragrance isn’t necessary.
Choose appropriate cleaning products and prioritize rinsing and drying rather than scent.
Leaving Surfaces Damp
Chinchilla habitats should stay dry.
Give cleaned surfaces enough time to dry completely before rebuilding the enclosure.
Ignoring Wooden Accessories
Wood can absorb urine and moisture.
Inspect wooden shelves and hides during every thorough cleaning.
Forgetting the Water Bottle
A dirty or blocked drinking nozzle can become a serious problem.
Clean the bottle and verify water flow regularly.
Cleaning Only When the Cage Smells
Don’t wait for odor.
Daily visual checks catch problems earlier.
Completely Stripping the Habitat Too Frequently
Not every cleaning session needs to become a full renovation.
Spot cleaning allows you to maintain sanitation without constantly dismantling the entire environment.
Using Air Fresheners Near the Cage
Masking an odor doesn’t remove the source.
Find what’s dirty and clean it.
Returning Damp Accessories
Even if you’re almost finished, don’t rush the drying stage.
Keep your chinchilla somewhere safe until the habitat is ready.
Use Cleaning Time as a Health Check
One of the most valuable parts of cleaning is seeing what’s been happening inside the enclosure.
You’ll become familiar with what’s normal.
Pay attention to:
- Amount of food eaten
- Hay consumption
- Water consumption
- Number and appearance of droppings
- Urine patterns
- Chewing behavior
- Fur accumulation
Sudden changes can be important.
For example, dramatically fewer droppings combined with reduced eating shouldn’t simply be treated as a cleaning convenience.
It can indicate a health problem requiring prompt veterinary attention.
A Simple Chinchilla Cleaning Schedule
You don’t need a complicated spreadsheet taped to the wall.
A basic routine works well.
Every Day
- Check food and water.
- Remove wet or dirty material.
- Remove contaminated hay.
- Sweep obvious droppings.
- Inspect shelves.
- Check the water bottle for leaks.
- Look for damaged accessories.
Every Few Days or As Needed
- Refresh heavily used bedding areas.
- Change dirty liners.
- Wipe soiled shelves.
- Clean feeding areas.
- Remove accumulated debris.
Regularly
- Perform a more thorough habitat cleaning.
- Wash food and water containers.
- Clean hides and appropriate accessories.
- Replace bedding or liners.
- Inspect wooden shelves.
- Check attachment hardware.
- Clean the dust bath container.
- Inspect the entire enclosure for damage.
The exact frequency will vary.
Let the condition of the habitat guide you.
Frequently Asked Questions About Cleaning a Chinchilla Habitat
How Often Should I Clean My Chinchilla’s Cage?
Perform basic spot cleaning every day and more thorough cleaning regularly based on how quickly the enclosure becomes dirty.
Larger habitats with good maintenance may need less frequent complete cleaning than small or heavily used spaces.
Should I Remove Chinchilla Poop Every Day?
Removing accumulated droppings daily helps keep shelves and floor areas clean.
Chinchillas produce a lot of dry droppings, so quick daily sweeping can prevent a large buildup.
Can I Use Vinegar to Clean a Chinchilla Cage?
Diluted white vinegar is commonly used for cleaning certain pet-enclosure surfaces and can be useful for mineral and urine residue.
Use it appropriately for the material you’re cleaning, rinse when necessary, and allow everything to dry completely.
Never spray cleaning solutions around your chinchilla.
Can I Use Bleach?
For ordinary routine cleaning, harsh disinfectants usually aren’t necessary.
If veterinary circumstances require disinfection, follow the veterinarian’s instructions carefully regarding product choice, dilution, rinsing, ventilation, and drying.
Never expose a chinchilla directly to bleach fumes or residue.
Can I Vacuum a Chinchilla Cage?
A handheld vacuum can make removing hay, fur, and droppings convenient.
Move your chinchilla somewhere safe first, particularly if it’s frightened by the noise.
Never vacuum close to the animal.
How Do I Clean Wooden Chinchilla Shelves?
Remove loose debris, clean soiled areas without unnecessarily soaking the wood, and allow the shelf to dry completely.
Replace shelves that become deeply urine-soaked, heavily damaged, splintered, or impossible to clean adequately.
Should I Clean the Dust Bath?
Yes.
Remove contamination from the bathing dust and periodically clean the container itself.
Make sure the container is completely dry before adding clean dust.
Why Does My Chinchilla Cage Smell?
Check for wet bedding, urine-soaked wood, dirty liners, old hay, a leaking water bottle, or another source of moisture.
A strong odor usually means there’s a specific area that needs attention.
Avoid trying to cover the smell with fragrance products.
Should I Leave Some Old Bedding After Cleaning?
Unlike animals that build elaborate scent-based burrows, the priority with chinchillas is maintaining a clean, dry environment.
There’s generally no reason to deliberately preserve dirty bedding.
Keeping familiar clean accessories and maintaining a reasonably consistent cage layout can provide continuity without retaining contaminated material.
Keep the Routine Simple
The easiest chinchilla habitat to maintain isn’t necessarily the one you scrub constantly.
It’s the one you check consistently.
Spend a few minutes each day removing wet material, contaminated hay, loose droppings, and obvious messes. Check the water bottle. Look at the shelves. Pay attention to anything that seems different.
Those small habits prevent most messes from getting out of control.
Then, when it’s time for a more thorough cleaning, work systematically: move your chinchilla somewhere secure, remove loose items, clear debris, clean the enclosure and accessories, replace dirty bedding or liners, and let everything dry completely.
Don’t worry about making the habitat smell like flowers or look untouched.
A chinchilla home is supposed to contain hay, chew marks, and signs that an animal actually lives there.
Your goal is simply to keep that home clean, dry, safe, and comfortable.
And once you’ve finished?
Your chinchilla will probably spend the next several minutes inspecting your work before moving something exactly where it thinks it belongs.