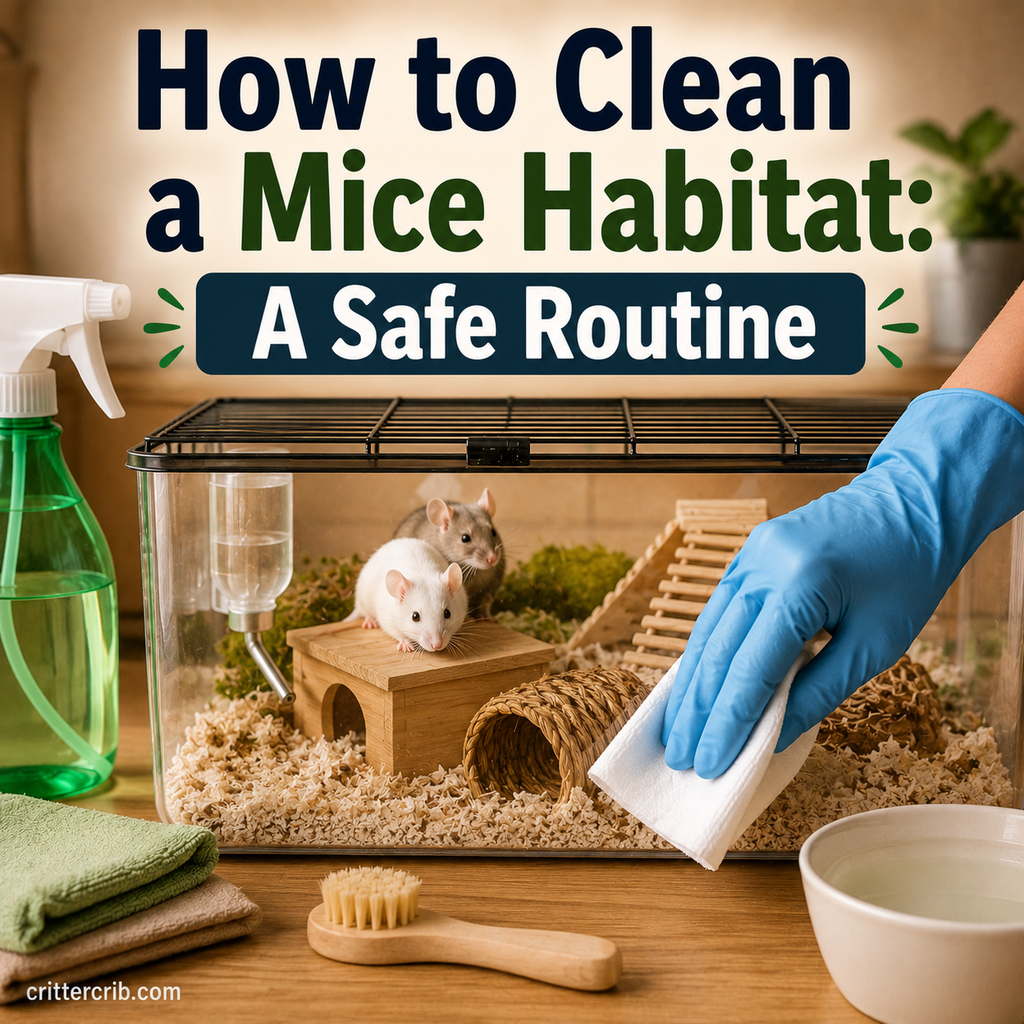
Cleaning a mouse habitat seems simple enough: remove the old bedding, wipe everything down, add fresh bedding, and you’re finished.
But there’s a little more to it than that.
Mice rely heavily on scent to understand their surroundings. Completely stripping away every familiar smell too often can be stressful, while not cleaning enough allows urine, waste, spoiled food, and moisture to build up.
The goal is to find a comfortable middle ground.
A good mouse habitat cleaning routine combines frequent spot cleaning with deeper cleaning when the enclosure actually needs it. You want the habitat to stay dry and sanitary without constantly turning your mice’s home into a completely unfamiliar place.
Here’s how to clean a mouse habitat safely, what supplies to use, how often to change bedding, and what to do about odor.
How Often Should You Clean a Mouse Habitat?
There isn’t one cleaning schedule that works for every mouse enclosure.
How quickly a habitat becomes dirty depends on:
- Number of mice
- Enclosure size
- Bedding depth
- Bedding material
- Ventilation
- Litter habits
- Cage layout
- Food choices
- Individual behavior
A spacious, well-ventilated habitat with appropriate absorbent bedding may stay cleaner much longer than a small enclosure with shallow bedding.
Rather than automatically stripping the cage on a specific day every week, combine routine spot cleaning with regular inspection.
Clean what needs cleaning.
A Simple Mouse Cleaning Schedule
A practical routine might include:
Daily or every couple of days:
- Remove spoiled fresh food
- Check the water
- Remove obviously wet bedding
- Clean heavily soiled surfaces
- Check for food hidden in damp areas
- Inspect the habitat for problems
Regularly as needed:
- Clean food and water equipment
- Remove heavily soiled nesting material
- Refresh dirty bedding areas
- Wipe frequently soiled surfaces
During a deeper clean:
- Replace most soiled bedding
- Clean the enclosure
- Wash dirty accessories
- Inspect toys and hides
- Rebuild the habitat
The habitat itself will help tell you when a deeper clean is necessary.
Why You Shouldn’t Overclean a Mouse Cage
Mice experience their environment partly through scent.
Their bedding, nest, hides, tunnels, and other objects develop familiar smells that help make the habitat feel like home.
If you remove absolutely everything and disinfect the entire enclosure too frequently, your mice may respond by scent marking the newly cleaned environment.
That can actually make odor return faster.
Overcleaning may also unnecessarily disrupt:
- Nests
- Tunnels
- Food stores
- Familiar sleeping areas
- Group scent
Cleanliness matters, but “completely odorless at all times” shouldn’t be the goal.
A mouse habitat should smell clean and not have a strong ammonia odor, but it doesn’t need to smell like household cleaner.
What Supplies Do You Need to Clean a Mouse Habitat?
You don’t need a cabinet full of specialized products.
A basic cleaning kit can include:
- Small dustpan and brush
- Paper towels or reusable cleaning cloths
- Scrub brush
- Warm water
- Mild pet-appropriate cleaner
- White vinegar for appropriate surfaces
- Fresh bedding
- Trash bag
- Spare hides or accessories
- Temporary secure carrier or enclosure
Keep mouse-cleaning supplies separate from items used for kitchens or bathrooms.
A dedicated brush and cloth make this easy.
What Cleaners Are Safe for Mouse Cages?
Use cleaning products that are appropriate around small animals and rinse surfaces thoroughly when required.
Strongly scented household products generally aren’t necessary for routine habitat maintenance.
Mice have sensitive respiratory systems, so avoid filling their environment with strong fumes or fragrances.
For routine cleaning, warm water and mechanical scrubbing can remove a surprising amount of dirt.
For appropriate washable surfaces, diluted white vinegar is commonly used to help remove urine residue and mineral buildup.
Pet-safe cleaners can also be useful when used according to their directions.
Cleaning Products to Be Careful With
Avoid casually spraying the habitat with products such as:
- Air fresheners
- Strongly fragranced cleaners
- Essential oil sprays
- Deodorizers
- Aerosol cleaners
- Undiluted harsh chemicals
Never spray cleaning products around mice while they’re still inside the enclosure.
If a stronger disinfectant is necessary because of illness or another specific concern, follow veterinary guidance and the product’s directions carefully.
Step-by-Step: How to Clean a Mouse Habitat
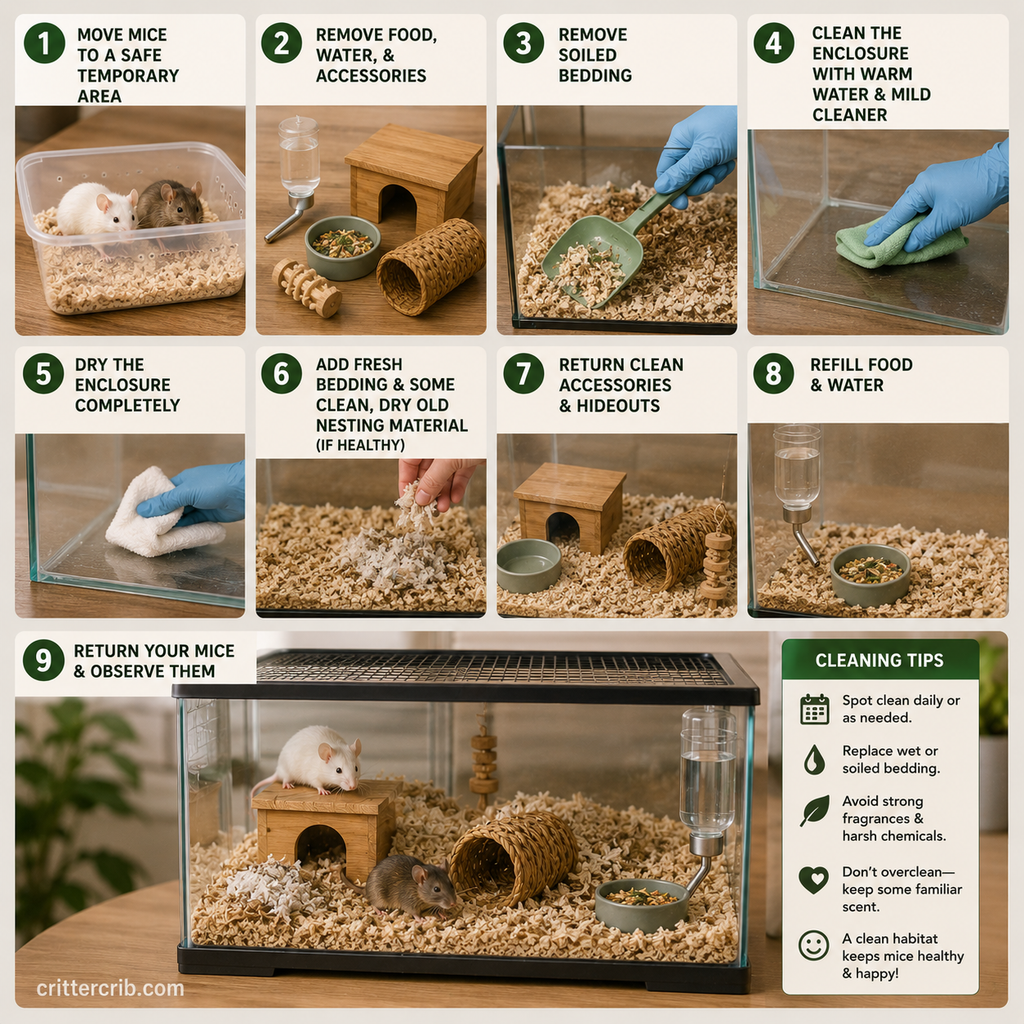
When it’s time for a deeper clean, having a routine makes the process much easier.
1. Move Your Mice to a Secure Temporary Area
Before cleaning, place your mice somewhere safe.
A secure carrier or temporary enclosure works well.
Give them appropriate bedding and somewhere to hide if the cleaning process will take more than a few minutes.
Double-check that the temporary enclosure is escape-proof.
Mice are extremely good at squeezing through small openings.
2. Remove Food and Water Equipment
Take out:
- Food bowls
- Water bottles
- Water dishes if used
- Treat holders
- Feeding platforms
Set them aside for separate cleaning.
Discard spoiled or contaminated food.
Don’t automatically throw away every piece of dry food you find in a clean cache, but inspect stored food carefully for moisture, mold, or contamination.
3. Remove Toys, Hides, and Accessories
Take out removable cage furniture.
This may include:
- Hides
- Tunnels
- Wheels
- Platforms
- Bridges
- Chew toys
- Hammocks
- Ropes
Inspect everything as you remove it.
Cleaning day is a good opportunity to notice damaged items that are easy to overlook during normal daily care.
4. Save Some Clean Familiar Bedding
If your mice are healthy and there’s no medical reason to fully disinfect the habitat, consider keeping a small amount of clean, dry old bedding or nesting material.
You can mix this back into the fresh setup.
The familiar scent can make the newly cleaned environment less disruptive.
Don’t save bedding that is:
- Wet
- Heavily soiled
- Moldy
- Contaminated with spoiled food
- Associated with an illness requiring disinfection
The point is to preserve safe familiar scent, not dirt.
5. Remove Soiled Bedding
Discard bedding that is wet, dirty, or heavily contaminated.
Pay extra attention to:
- Corners
- Under the water bottle
- Beneath sleeping areas
- Around food stations
- Favorite toilet areas
- Under platforms
Urine can collect in areas you don’t immediately see.
6. Wash the Empty Enclosure
Wipe or scrub the enclosure using your chosen mouse-appropriate cleaning method.
Focus on visible residue rather than soaking everything in strong cleaner.
Pay attention to:
- Corners
- Seams
- Cage bases
- Platforms
- Urine deposits
- Areas beneath accessories
If you’re using a cleaning product that requires rinsing, rinse thoroughly.
7. Dry Everything Completely
Don’t add fresh bedding to a wet cage.
Moisture trapped beneath bedding can create an unhealthy environment and encourage unpleasant odors.
Use clean towels if necessary, then allow surfaces to finish drying.
Everything should be dry before the habitat is rebuilt.
8. Add Fresh Bedding
Once the enclosure is dry, add clean, appropriate bedding.
Mice enjoy digging, nesting, and creating tunnels, so avoid using only a paper-thin layer when the habitat can safely accommodate deeper substrate.
If you’ve retained a little clean old bedding, mix it into the fresh material or place some near familiar sleeping areas.
9. Return Clean Accessories
Put the wheel, hides, platforms, tunnels, and other accessories back into the enclosure.
You don’t have to put everything in exactly the same location.
Occasional layout changes can provide enrichment.
However, changing every object, every scent, and the entire layout simultaneously can be a lot of novelty at once.
Leaving a few familiar features can make the transition easier.
10. Refill Food and Water
Add fresh food and clean drinking water.
Before returning the mice, test the water bottle.
Make sure:
- Water flows
- The bottle isn’t leaking
- The drinking tube isn’t blocked
- The attachment is secure
Never assume a full bottle is working correctly.
11. Return Your Mice and Observe Them
Once the habitat is clean, dry, and fully rebuilt, return your mice.
They may immediately begin:
- Digging
- Rearranging bedding
- Moving nesting material
- Investigating cleaned objects
- Scent marking
- Rebuilding a nest
That’s normal.
You’ve just renovated their entire house without asking them.
Give them time to put everything back where they think it belongs.
How to Spot Clean a Mouse Habitat
Spot cleaning is the secret to avoiding unnecessarily frequent full cage cleanouts.
Instead of removing everything, target problem areas.
Remove Wet Bedding
Check beneath:
- Water bottles
- Water bowls
- Corners
- Platforms
- Sleeping areas
A leaking water bottle can saturate bedding surprisingly quickly.
If one area repeatedly becomes wet, figure out why rather than simply replacing the bedding every day.
Remove Spoiled Food
Mice often carry food away and store it.
This is normal behavior, but fresh foods can become a problem if they’re hidden.
Check for vegetables or other perishable foods that have been moved into nests or buried.
Remove them before they spoil.
Clean Heavily Soiled Surfaces
Some mice repeatedly urinate on the same shelf, wheel, or platform.
Wipe those areas when necessary rather than waiting for the next full cage clean.
How Often Should You Change Mouse Bedding?
Bedding shouldn’t necessarily be replaced according to a rigid calendar.
How long it lasts depends heavily on the enclosure.
A small cage with several mice and shallow bedding will become soiled faster than a large habitat with deep, absorbent substrate.
Instead of asking only, “Has it been seven days?” look at the bedding.
Replace it when it becomes:
- Wet
- Heavily soiled
- Strong smelling
- Contaminated
- Unable to keep the enclosure dry
Partial bedding changes can often extend the time between complete cleanouts.
Should You Replace All the Bedding?
Not necessarily.
For healthy mice, replacing every piece of bedding during every clean may remove more familiar scent than necessary.
If part of the bedding is still clean and dry, you may be able to retain some of it.
This can be particularly useful with deep-bedding setups.
However, a complete bedding replacement may be appropriate when:
- Bedding is broadly contaminated
- There is significant ammonia buildup
- Mold is present
- Parasites or infectious illness are being addressed
- A veterinarian recommends disinfection
- The entire substrate has become excessively dirty
Health and sanitation always take priority over scent preservation.
How to Clean a Mouse Wheel
Exercise wheels can become one of the dirtiest objects in the enclosure.
Some mice urinate while running.
Others use the wheel as a toilet.
Check it frequently.
For a washable wheel:
- Remove loose debris.
- Wash with warm water and an appropriate cleaner if needed.
- Scrub grooves and seams.
- Rinse thoroughly.
- Dry completely.
- Return it to the habitat.
Don’t allow urine residue to accumulate simply because the rest of the cage looks clean.
How to Clean Mouse Hides and Tunnels
The cleaning method depends on the material.
Plastic or Other Washable Hides
Wash with warm water and an appropriate cleaning product when needed.
Rinse and dry thoroughly.
Inspect chew damage before returning them.
Wooden Hides
Wood is porous and can absorb urine.
Lightly soiled wooden items may be spot cleaned and dried thoroughly, but heavily saturated wood can be difficult to sanitize.
Replace wooden items when they become excessively dirty, damaged, or impossible to clean safely.
Cardboard Hides
Cardboard is cheap enrichment and doesn’t need to last forever.
If a cardboard box or tube becomes wet or heavily soiled, discard it and provide a clean replacement.
How to Clean Mouse Food Bowls
Wash food dishes regularly with warm water and an appropriate unscented dish-cleaning method.
Rinse thoroughly and dry before refilling.
Remove old food that has become damp or contaminated.
If you scatter feed, check the substrate for large amounts of uneaten food before adding more.
Mice may store more than you realize.
How to Clean a Mouse Water Bottle
Water bottles need more than occasional refilling.
Regularly empty and wash the bottle.
Pay attention to the drinking tube, where residue can accumulate.
A small bottle brush can help clean difficult areas.
Every day, check:
- Water level
- Flow
- Leaks
- Blockages
- Attachment
Replace bottles that are cracked, damaged, or unreliable.
How to Control Mouse Cage Odor
If the enclosure smells strongly shortly after cleaning, don’t immediately reach for a deodorizing spray.
Try to identify the source.
Strong odor may result from:
- Too many mice in too little space
- Poor ventilation
- Inadequate bedding
- Low-quality absorbency
- Wet areas
- Dirty wheels
- Urine-soaked wooden furniture
- Leaking water bottles
- Spoiled food
- Excessive scent marking after aggressive cleaning
Solving the underlying problem is more effective than covering the smell.
Don’t Use Fragrance to Hide Odor
Avoid placing air fresheners, scented bedding, essential oil diffusers, or fragrance sprays around the mouse enclosure.
A habitat should smell clean because it’s appropriately maintained, not because another scent is covering the odor.
Male Mice and Cage Odor
Male mice can have a stronger natural scent than females and may scent mark more noticeably.
This doesn’t necessarily mean the cage is dirty.
Aggressively cleaning every time you detect normal mouse scent can become counterproductive if it encourages more marking.
Focus on controlling actual urine buildup and keeping the habitat sanitary.
If there’s a sharp ammonia smell, however, that’s different.
The enclosure needs attention.
Why Does My Mouse Cage Smell Like Ammonia?
A strong ammonia smell indicates that urine waste is accumulating.
Don’t ignore it.
Ammonia can irritate the respiratory system, and mice are already prone to respiratory problems.
If you notice a strong sharp odor:
- Locate wet and heavily soiled areas.
- Replace contaminated bedding.
- Clean soiled surfaces.
- Check ventilation.
- Check the enclosure size.
- Reevaluate your bedding.
- Increase spot cleaning if necessary.
If ammonia returns extremely quickly, your overall housing setup may need improvement.
Cleaning a Multi-Mouse Habitat
With several mice, resource areas can become dirty faster.
Provide enough:
- Sleeping areas
- Hides
- Food access
- Water access
- Enrichment
A larger enclosure also spreads waste across more space.
For groups, pay particular attention to nests and food stores.
Don’t completely destroy a clean communal nest during every spot clean just because it looks messy to you.
Mice are supposed to make nests.
Should You Clean While Your Mice Are in the Cage?
Minor spot cleaning can sometimes be done with mice present if you can work safely without stressing them or risking escape.
For a deeper clean, moving them to a secure temporary enclosure is generally easier and safer.
It allows you to:
- Open cage doors freely
- Remove large accessories
- Change bedding
- Use cleaning products away from the mice
- Dry the habitat completely
Never spray cleaner into an occupied habitat.
Cleaning After a Mouse Has Been Sick
Normal cleaning advice changes when illness is involved.
If one or more mice have an infectious condition, parasites, or another medical issue, you may need a more thorough disinfection routine.
In that situation, follow your veterinarian’s instructions.
You may need to:
- Replace all bedding
- Discard porous accessories
- Disinfect the enclosure
- Wash reusable items thoroughly
- Change cleaning frequency
- Temporarily avoid preserving old nesting material
Don’t prioritize familiar scent when doing so could preserve a source of contamination.
Common Mouse Cage Cleaning Mistakes
A good routine is as much about what you don’t do as what you do.
Cleaning Everything Too Often
Constantly stripping the enclosure can remove familiar scents and encourage more marking.
Use spot cleaning to maintain the habitat between deeper cleans.
Waiting Until the Cage Smells Strongly
At the other extreme, don’t wait for an overwhelming odor before cleaning.
Check moisture and waste regularly.
Using Strong Fragrances
A clean smell to humans isn’t necessarily appropriate for mice.
Avoid perfumes and heavily scented cleaning products.
Leaving Surfaces Wet
Fresh bedding shouldn’t go into a damp enclosure.
Dry everything thoroughly.
Forgetting the Wheel
The wheel can become one of the biggest sources of odor.
Inspect it often.
Ignoring Hidden Food
Fresh food can disappear into nests and spoil.
Check common storage areas.
Reusing Dirty Bedding
Preserving a little familiar scent doesn’t mean saving heavily soiled substrate.
Only retain bedding that is genuinely clean and dry.
Ignoring Cage Size and Ventilation
If the enclosure becomes filthy almost immediately, cleaning frequency may not be the real problem.
The housing itself may need improvement.
A Simple Daily Mouse Habitat Routine
A few minutes of maintenance can prevent larger problems.
Each day:
- Observe your mice
- Check food
- Check water flow
- Remove spoiled fresh food
- Look for wet bedding
- Check heavily used surfaces
- Make sure the enclosure is secure
You don’t need to disturb the entire habitat.
The goal is to catch small problems early.
A Simple Weekly Mouse Habitat Check
Once a week, inspect the setup more closely.
Check:
- Bedding condition
- Nesting areas
- Food stores
- Wheel cleanliness
- Water bottle
- Hides
- Tunnels
- Platforms
- Chew toys
- Enclosure ventilation
- Cage security
Spot clean or replace items as needed.
A weekly inspection doesn’t necessarily mean a complete weekly cage change.
Let the actual condition of the habitat determine how much cleaning is necessary.
Signs Your Mouse Habitat Needs Cleaning
Instead of relying entirely on the calendar, watch for these signs:
- Strong urine odor
- Ammonia smell
- Large wet areas
- Heavily soiled bedding
- Dirty wheels or platforms
- Mold
- Spoiled food
- Excessive waste accumulation
- Damp nesting areas
A clean habitat should remain reasonably dry and free from strong unpleasant odors.
How to Make Mouse Cage Cleaning Easier
A few setup choices can dramatically simplify maintenance.
Choose an Accessible Enclosure
Large doors and removable trays make cleaning easier.
If you can’t comfortably reach the corners, you’re less likely to clean them properly.
Use Enough Absorbent Bedding
Appropriate bedding helps control moisture and odor.
A very thin layer may become saturated quickly.
Keep Spare Supplies Ready
Keep fresh bedding, cleaning cloths, and replacement cardboard hides available.
You don’t want to discover you’re out of bedding halfway through a cage clean.
Learn Your Mice’s Favorite Toilet Areas
Some mice repeatedly use particular corners or surfaces.
Once you identify them, spot cleaning becomes much faster.
Keep a Secure Temporary Carrier Nearby
Having a ready-to-use carrier makes deep cleaning easier and gives you something appropriate for veterinary trips and emergencies.
Frequently Asked Questions About Cleaning a Mouse Habitat
How often should you completely clean a mouse cage?
There’s no universal schedule.
The appropriate frequency depends on cage size, number of mice, bedding, ventilation, and how quickly the enclosure becomes soiled.
Use regular spot cleaning and perform deeper cleaning when the habitat needs it.
Can I use vinegar to clean a mouse cage?
Diluted white vinegar is commonly used on appropriate washable surfaces to help remove urine residue.
Keep the mice away while cleaning, rinse surfaces when appropriate, and allow everything to dry before returning them.
Can I use dish soap to clean a mouse cage?
A mild, unscented cleaning method can be appropriate for washable food dishes, bottles, and some enclosure components when thoroughly rinsed afterward.
Avoid leaving soap residue or strong fragrance behind.
Should I remove all old mouse bedding?
Not during every routine cleaning.
If some bedding is clean and dry, retaining a small amount can preserve familiar scent.
Discard anything wet, heavily soiled, moldy, or contaminated.
Why does my mouse cage smell right after I clean it?
Mice may increase scent marking after their familiar odors have been completely removed.
If you’re fully stripping and disinfecting the cage very frequently, try relying more on targeted spot cleaning when appropriate.
How do I stop my mouse cage from smelling?
Focus on the source rather than masking the odor.
Use a suitably sized, well-ventilated enclosure with absorbent bedding, remove wet areas regularly, clean heavily soiled accessories, prevent water leaks, and remove spoiled food.
Can I use air freshener near mice?
It’s best to avoid fragrance sprays, aerosols, essential oil diffusers, and similar products around a mouse habitat.
Good ventilation and proper cleaning are safer ways to manage odor.
Should I wash mouse toys every time I clean the cage?
Not necessarily.
Wash an item when it’s dirty or contaminated.
Some chewable and cardboard enrichment is better replaced when soiled rather than washed.
Why does my mouse wheel smell so bad?
Mice may urinate or defecate while running, making the wheel a concentrated source of odor.
Inspect and clean it more frequently than the rest of the habitat if necessary.
Final Thoughts on Cleaning a Mouse Habitat
The best mouse habitat cleaning routine isn’t the one that uses the most disinfectant or removes every trace of mouse smell.
It’s the one that keeps the enclosure dry, sanitary, comfortable, and familiar.
Spot clean wet bedding and dirty surfaces regularly. Remove spoiled food before it becomes a problem. Wash food and water equipment, inspect the wheel, and perform deeper cleaning when the condition of the enclosure calls for it.
When your mice are healthy, preserving a small amount of clean bedding or familiar nesting material can make a freshly cleaned habitat feel less disruptive.
And if the cage develops a strong odor unusually quickly, look beyond cleaning frequency.
Check the enclosure size, ventilation, bedding, water bottle, wheel, wooden accessories, and hidden food stores. There’s often a specific reason.
Your mice will probably rearrange the habitat the moment you return them anyway.
That’s fine.
You’ve handled the cleaning.
They’ll take care of redecorating.