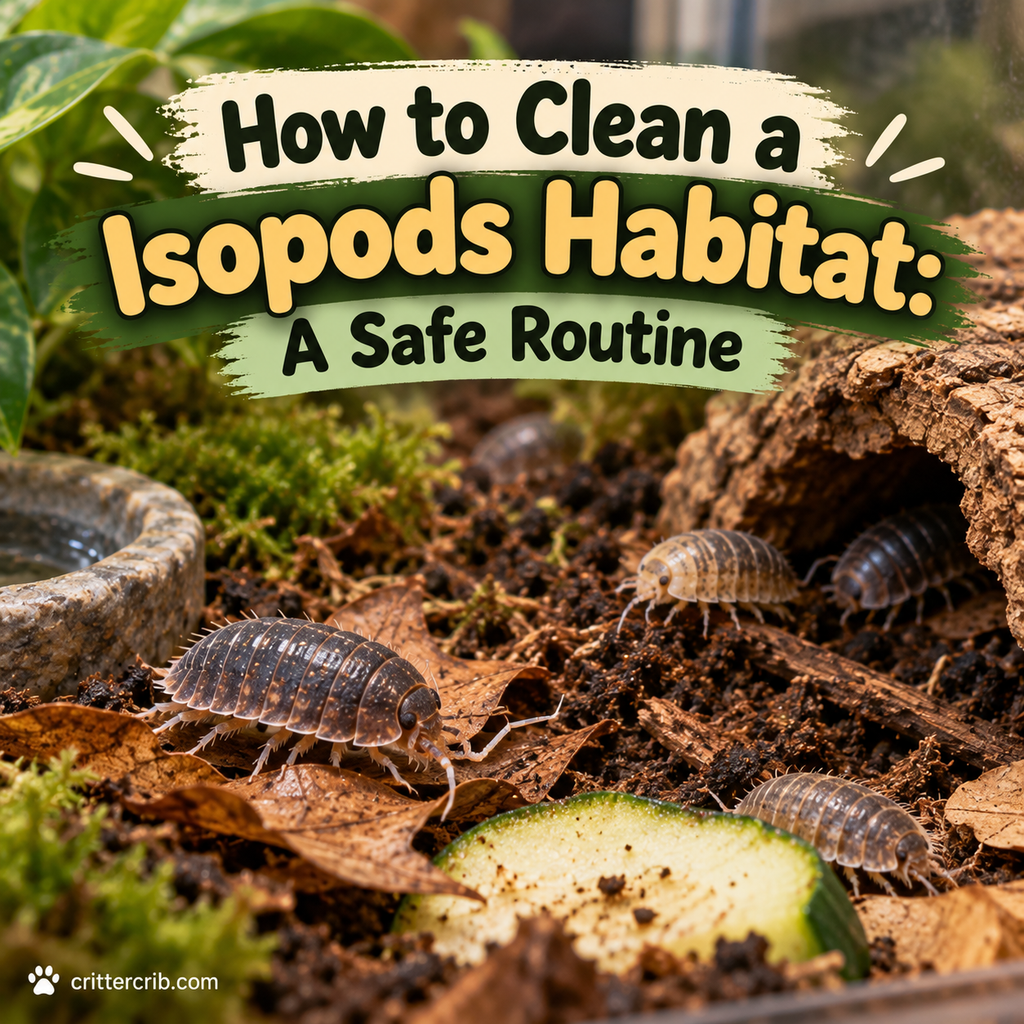
Cleaning an isopod habitat isn’t quite like cleaning a hamster cage or reptile tank. If your first instinct is to remove all the substrate, scrub the enclosure, and replace everything with fresh material, resist it.
A healthy isopod enclosure is a tiny ecosystem.
The substrate contains microorganisms, decomposing organic matter, and often springtails that work alongside your isopods. Completely replacing that environment every few weeks can cause more disruption than good.
Instead, isopod habitat cleaning is mostly about maintenance: removing problem food, dealing with mold when necessary, replenishing leaf litter and decaying wood, keeping ventilation clear, and watching moisture levels.
Done properly, cleaning should disturb the colony as little as possible.
Here’s how to keep an isopod habitat clean without constantly tearing apart the ecosystem you’ve worked to establish.
Do Isopod Habitats Need to Be Cleaned?
Yes, but probably not in the way you’re imagining.
Isopods are detritivores. Much of what would look “messy” in another pet enclosure is actually part of their environment.
They naturally consume decaying organic material, including:
- Dead leaves
- Decaying wood
- Plant material
- Other organic matter
This means a layer of leaves scattered across the substrate isn’t something you need to clean up. It’s food, cover, and habitat.
The goal isn’t to make the enclosure look spotless.
Instead, cleaning focuses on preventing conditions that could become unhealthy, such as excessive leftover food, persistent mold outbreaks, pest problems, poor airflow, or substrate that has deteriorated over time.
Why You Shouldn’t Deep-Clean an Isopod Habitat Too Often
A mature isopod enclosure develops its own biological community.
The substrate isn’t just dirt. It becomes part of the colony’s ecosystem.
Frequently replacing all of it can remove beneficial microorganisms and disturb young isopods that are difficult to see.
Baby isopods, called mancae, can be tiny. A scoop of “old” substrate that looks empty may contain juveniles you haven’t noticed.
Frequent deep cleaning also disrupts burrows, hiding areas, moisture gradients, and established feeding zones.
For most established colonies, regular spot cleaning is far more useful than repeatedly rebuilding the enclosure.
How Often Should You Clean an Isopod Habitat?
There isn’t a universal cleaning schedule.
A small, heavily populated colony may need attention more frequently than a large enclosure with relatively few isopods.
Instead of cleaning on a strict calendar, inspect the enclosure regularly.
Routine maintenance might include:
- Removing spoiled supplemental food
- Replenishing leaf litter
- Checking moisture
- Cleaning the viewing area if desired
- Removing obvious problem mold
- Checking ventilation holes
- Inspecting for unwanted pests
- Replacing deteriorated pieces of décor when necessary
A properly functioning enclosure can often go a long time without a complete substrate replacement.
The colony itself will tell you more than a calendar will.
What You Need to Clean an Isopod Enclosure
You don’t need a cabinet full of cleaning products.
In fact, simpler is usually safer.
Useful supplies include:
- Disposable gloves
- Small spoon or scoop
- Soft brush
- Paper towels
- Clean container
- Dechlorinated or otherwise appropriate water
- Replacement leaf litter
- Replacement decaying wood
- Fresh substrate ingredients if needed
Avoid automatically reaching for household disinfectants, scented sprays, bleach, or other chemical cleaners while isopods remain in the enclosure.
Isopods are small invertebrates, and chemical residues aren’t something you want mixed into their substrate or food.
Step-by-Step Isopod Habitat Cleaning Routine
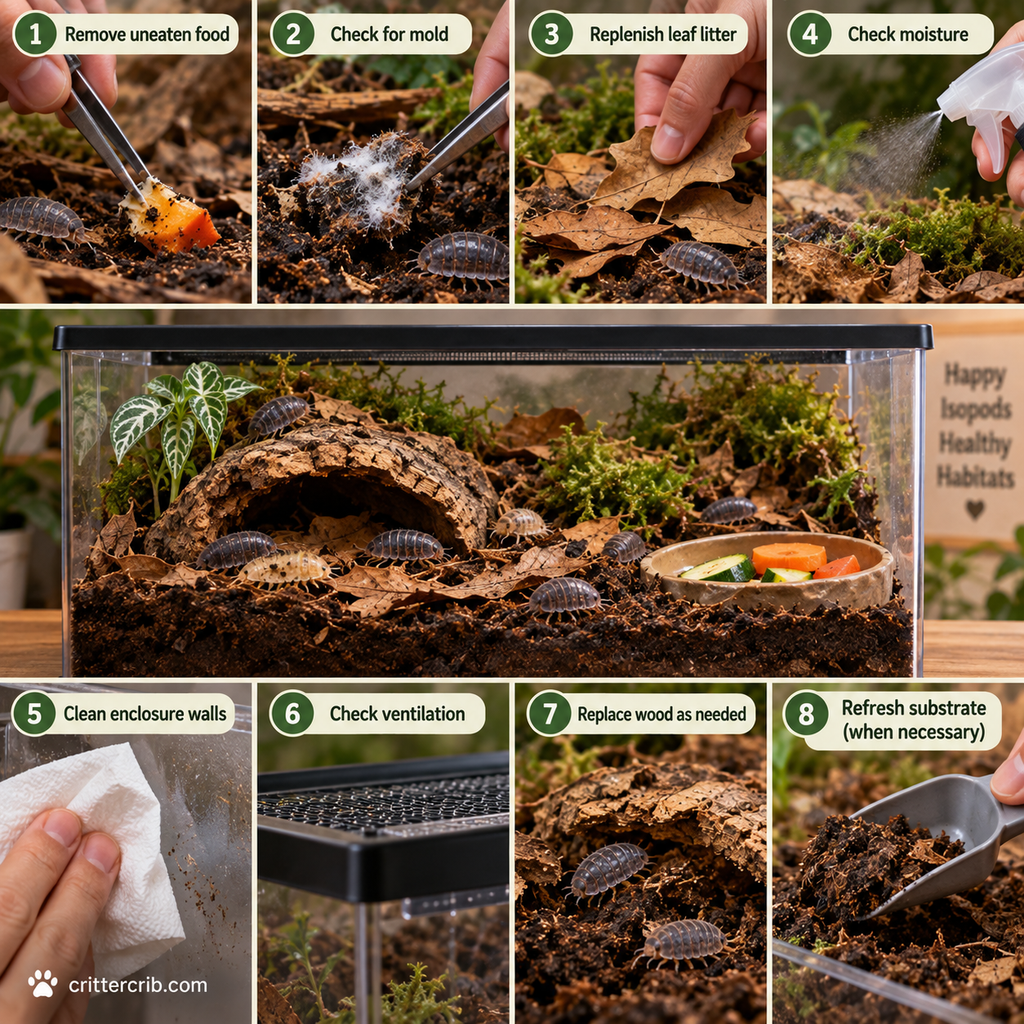
For normal maintenance, you usually don’t need to remove the entire colony.
The safest approach is to work slowly and disturb as little substrate as possible.
1. Inspect the Habitat Before Touching Anything
Take a minute to look around.
Check:
- Food dishes
- Moist areas
- Dry areas
- Leaf litter
- Wood
- Hides
- Ventilation
- Visible isopods
- Mold growth
- Signs of unwanted organisms
This helps you identify what actually needs attention.
If everything looks and smells normal, you may only need to remove old food and replenish a few materials.
2. Remove Uneaten Supplemental Food
Supplemental foods can spoil much faster than leaves and wood.
Fresh vegetables, fruit, fish food, shrimp, and other protein-rich foods can encourage mold or attract unwanted pests when too much is provided.
Remove leftovers before they become a problem.
A useful rule is to offer small portions and increase the amount only when the colony consistently consumes them.
You’ll quickly learn how much your colony can handle.
3. Check for Mold
A little mold isn’t necessarily an emergency.
Isopod enclosures contain moisture and decomposing organic material, so occasional fungal growth isn’t surprising.
Small outbreaks may disappear as the enclosure matures, particularly when springtails are present.
If mold is heavily concentrated on a piece of supplemental food, remove the food.
For persistent or extensive mold, consider whether you’re:
- Overfeeding
- Keeping the entire enclosure excessively wet
- Providing insufficient ventilation
- Allowing too much food to accumulate
Treat the cause rather than trying to make the enclosure completely fungus-free.
4. Inspect the Leaf Litter
Leaf litter is one of the most important resources in an isopod enclosure.
Don’t remove leaves just because they’re breaking down.
That’s exactly what they’re supposed to do.
Instead, replenish the leaf layer as it gets consumed.
Suitable leaf litter should come from safe sources and be prepared appropriately before entering the enclosure.
A healthy colony may consume leaves faster than you expect, especially as its population increases.
5. Check Decaying Wood
Many isopods benefit from access to soft, decaying hardwood.
Like leaf litter, this material isn’t decoration that needs to stay pristine.
It’s part of the habitat.
Replace or supplement decaying wood as it becomes consumed or breaks down. Avoid collecting random wood from locations where pesticides, pollution, or other contaminants may be present.
6. Check the Moisture Gradient
Moisture management is one of the most important parts of isopod care.
Isopods breathe using specialized structures that need moisture to function properly, but that doesn’t mean the entire enclosure should be saturated.
Many commonly kept species do well with a moisture gradient that provides a consistently moist area while allowing other portions of the enclosure to remain less wet.
During cleaning, check whether the substrate is:
- Drying out completely
- Waterlogged throughout
- Maintaining a useful gradient
- Developing stagnant areas
Adjust gradually rather than flooding the enclosure.
Different isopod species have different moisture preferences, so research the particular species you’re keeping.
7. Clean the Enclosure Walls if Necessary
Condensation, substrate, and organic debris may eventually make the enclosure walls difficult to see through.
If you want to clean the inside viewing area, use a damp paper towel or cloth with appropriate water.
Move slowly.
Tiny mancae may be climbing on the enclosure walls or hiding near the substrate line.
There’s no need for perfectly polished walls. This is a humid habitat filled with decomposing material, not a display case.
8. Check the Ventilation
Ventilation openings can become obstructed by substrate, condensation, webbing, or debris.
Make sure air can still move through the enclosure.
Good ventilation helps prevent stagnant conditions while allowing you to maintain the moisture levels required by the species.
Be careful when cleaning ventilation holes. Small isopods can hide around openings.
9. Replace Hides Carefully
Pieces of cork bark, wood, and other hides often become gathering places for the colony.
Lift them slowly.
You’ll frequently find isopods clustered underneath, and females or tiny mancae may be present.
If the hide is still usable, there’s usually no reason to clean it simply because it has soil or organic material attached.
Put it back gently.
Should You Remove Isopod Poop?
Usually, not during routine maintenance.
Isopod waste, often called frass, becomes incorporated into the enclosure substrate.
In a functioning bioactive system, microorganisms and other decomposers help process organic waste.
Over a long period, however, a heavily populated colony can alter the substrate considerably. At that point, partial substrate replacement may be useful.
This is another reason to monitor the condition of the enclosure rather than following an arbitrary cleaning schedule.
Should You Use Springtails With Isopods?
Springtails are commonly kept alongside isopods and can be extremely useful in bioactive setups.
These tiny decomposers consume fungal growth and other organic material.
They aren’t a replacement for proper husbandry, but they can help keep a moist enclosure balanced.
A thriving springtail population may be especially helpful when you’re dealing with minor mold growth.
Don’t panic if you see tiny white organisms hopping around the substrate. If they’re springtails, they’re probably members of the cleanup crew rather than pests you need to eliminate.
How to Handle Mold in an Isopod Habitat
Mold is one of the most common reasons new keepers think their enclosure needs a complete cleaning.
Usually, it doesn’t.
If you find mold:
- Identify what it’s growing on.
- Remove spoiled supplemental food.
- Reduce the amount of food offered if leftovers are common.
- Check that ventilation isn’t blocked.
- Make sure the entire enclosure isn’t constantly saturated.
- Allow springtails to help control minor fungal growth.
A small amount of fungal activity is part of decomposition.
An enclosure repeatedly covered in heavy mold, however, suggests that something about the setup needs adjustment.
What About Fungus Gnats and Other Pests?
Fungus gnats can become frustrating in moist enclosures.
Their larvae thrive in damp organic substrate, which unfortunately describes many isopod habitats quite well.
Prevention is easier than dealing with a major infestation.
Avoid excessive moisture and overfeeding, and consider quarantining new natural materials before adding them to an established colony.
If unwanted organisms appear, identify them before trying to eliminate them.
Don’t spray insecticides into an isopod enclosure.
A product designed to kill unwanted insects can also harm the invertebrates you’re deliberately keeping.
When Should You Replace Isopod Substrate?
Complete substrate replacement should not be a frequent routine task.
Over time, however, the substrate can become depleted or heavily processed by a large colony.
Signs that partial replacement may be worth considering include:
- Substrate structure has noticeably deteriorated
- The colony has consumed much of the organic material
- The enclosure has become extremely crowded
- Moisture no longer distributes normally
- Persistent problems continue despite routine maintenance
Partial replacement is usually less disruptive than removing everything.
How to Replace Substrate Safely
Work in sections.
Remove a portion of older substrate and replace it with a suitable fresh mixture while leaving much of the established habitat intact.
Before discarding old substrate, inspect it carefully.
Mancae can be extremely difficult to see.
You can also place removed substrate in a temporary container with food and moisture for a period of time. This gives hidden isopods an opportunity to emerge before the material is discarded.
When Is a Full Isopod Enclosure Reset Necessary?
Occasionally, a complete reset may be justified.
Examples could include:
- Serious contamination
- A major pest infestation that can’t otherwise be controlled
- Chemical exposure
- Severely degraded substrate
- Major husbandry problems requiring a redesigned enclosure
A full reset should be the exception rather than normal maintenance.
If you need to reset the enclosure, carefully move as many adults and juveniles as possible into a temporary holding container with appropriate substrate, moisture, ventilation, and hides.
Remember that many tiny individuals may remain in the original substrate.
How to Clean an Empty Isopod Enclosure
If the colony has been completely moved and the enclosure itself genuinely needs cleaning, the process is easier.
Remove all substrate and organic materials first.
Wash the empty enclosure using warm water and thoroughly remove any residue or debris.
If a cleaning or disinfecting product is necessary because of contamination, make sure it’s appropriate for the enclosure material and that no residue remains before rebuilding the habitat.
Rinse thoroughly and allow the enclosure to dry or otherwise become safe for reuse before returning the colony.
Never mix cleaning chemicals.
For ordinary maintenance, chemical disinfection usually isn’t necessary.
Common Isopod Habitat Cleaning Mistakes
A few habits can turn a simple maintenance session into unnecessary disruption.
Replacing All the Substrate Too Frequently
You remove beneficial organisms along with the old substrate and risk throwing away tiny isopods.
Spot clean instead.
Removing Decomposing Leaves
Brown, broken-down leaves aren’t trash to an isopod.
They’re dinner.
Keep replenishing leaf litter instead of removing it because it looks messy.
Overfeeding After Cleaning
A freshly maintained enclosure doesn’t need a huge pile of food.
Start with a small amount and see how quickly the colony consumes it.
Trying to Eliminate Every Trace of Mold
A bioactive enclosure isn’t sterile.
Address excessive mold, but don’t expect a decomposer habitat to remain completely free of fungi.
Using Household Insecticides
This can be disastrous for an isopod colony.
Always remember that your pets are arthropods. Products intended to kill household pests may also kill the animals you’re trying to protect.
Cleaning Too Aggressively
Isopod habitats benefit from stability.
Constantly moving hides, digging through substrate, and rearranging everything can unnecessarily disturb the colony.
A Simple Weekly Isopod Maintenance Check
You don’t need to perform a major cleaning every week.
Instead, spend a few minutes checking the habitat.
Look for:
- Spoiled supplemental food
- Waterlogged or excessively dry substrate
- Adequate leaf litter
- Available decaying wood
- Clean water or moisture sources, if used
- Clear ventilation
- Unusual mold growth
- Unwanted pests
- Healthy colony activity
Remove what needs removing, replenish what has been consumed, and leave the rest alone.
That’s often all an established colony needs.
Frequently Asked Questions About Cleaning Isopod Habitats
How often should I completely clean an isopod enclosure?
A complete cleaning generally shouldn’t be part of a frequent routine. Established isopod habitats benefit from biological stability.
Spot cleaning and replenishing resources are usually more appropriate.
Should I remove dead leaves from an isopod enclosure?
No, assuming the leaves are safe for the species and haven’t been contaminated.
Dead leaves are a major food source and habitat component for many isopods.
Is mold dangerous to isopods?
A small amount of mold isn’t automatically dangerous and is common in moist environments containing decomposing material.
Heavy or persistent mold growth may indicate overfeeding, excessive moisture, or inadequate ventilation.
Can I use soap to clean an isopod enclosure?
For routine cleaning while the colony is present, it’s safer to avoid introducing soaps and household cleaning chemicals.
A damp paper towel and appropriate water are generally enough for cleaning viewing surfaces.
Why are there tiny white bugs in my isopod tank?
They may be springtails, especially if they jump when disturbed.
Springtails are commonly introduced intentionally because they consume fungi and decomposing organic matter.
However, not every tiny organism is a springtail, so identify unfamiliar inhabitants before deciding what to do.
Do isopods clean their own enclosure?
Isopods are decomposers and process a significant amount of organic material, but that doesn’t mean the habitat requires no maintenance.
You still need to manage food, moisture, ventilation, leaf litter, substrate condition, and unwanted pests.
Keep the Habitat Healthy, Not Spotless
The biggest change in mindset when cleaning an isopod habitat is realizing that “clean” doesn’t mean sterile.
An enclosure filled with decomposing leaves, old wood, microorganisms, springtails, and bits of organic material may look messy compared with other pet habitats.
For isopods, that’s home.
Rather than repeatedly removing everything, focus on keeping the miniature ecosystem balanced.
Remove spoiled supplemental food. Replenish leaves and decaying wood. Maintain an appropriate moisture gradient. Keep ventilation clear. Watch for excessive mold and unwanted pests.
Most importantly, disturb the substrate only when there’s a reason to do so.
A healthy isopod colony does much of the cleanup work itself. Your job is less about scrubbing the habitat and more about keeping the ecosystem working.